Sunday, 28 April 2013

Transfer Database Task in SSIS

Transfer Database Task

The Transfer Database Task is used to move a database to another SQL Server instance or create a copy on the same instance (with different database name). This task works in two modes as shown below:
  • Offline : In this mode, the source database is detached from the source server after putting it in single user mode, copies of the mdf, ndf and ldf files are moved to specified network location. On the destination server the copies are taken from the network location to the destination server and then finally both databases are attached on the source and destination servers. This mode is faster, but a disadvantage with mode is that the source database will not available during copy and move operation. Also, the person executing the package with this mode must be sysadmin on both source and destination instances.
  • Online : In this mode, the task uses SMO to transfer the database objects to the destination server. In this mode, the database is online during the copy and move operation, but it will take longer as it has to copy each object from the database individually. Someone executing the package with this mode must be either sysadmin or database owner of the specified databases.
Now let me demonstrate how you can create an SSIS package with the Transfer Database Task.
Go to START -> Microsoft SQL Server 2005/2008 -> SQL Server Business Intelligence Development Studio to launch BIDS.
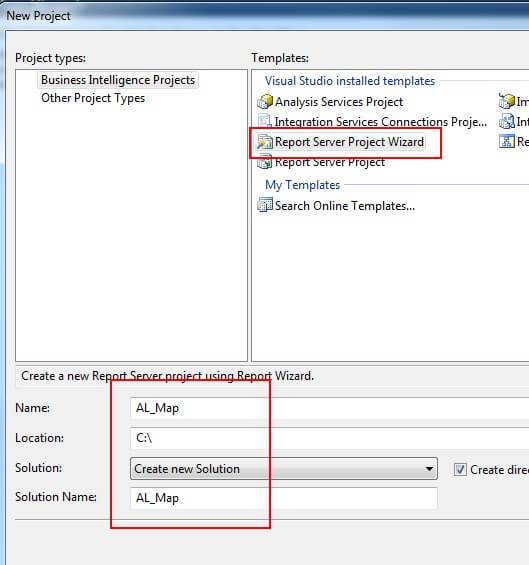
Then go to File menu -> New -> Project -> Select "Business Intelligence Projects" in the left tree pane -> Select "Integration Services Projects" and name the project as you wish and click OK.
In this new project you will see one package is already added with the 
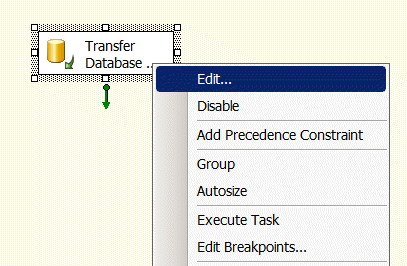
name "Package.dtsx". Drag the "Transfer Database Task" from the Toolbox 
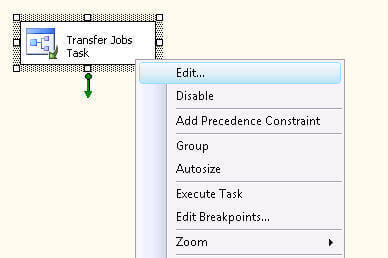
(which is normally on the left side) to the Control Flow pane. Right click on the task and select Edit... as shown below.
demonstrate how you can create an SSIS package with the Transfer Database Task.
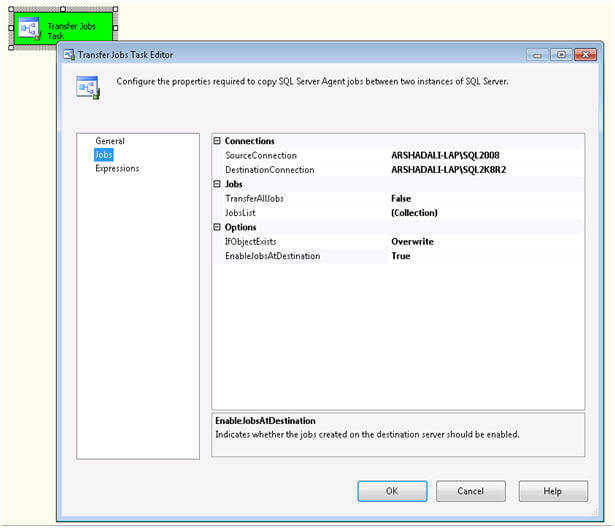
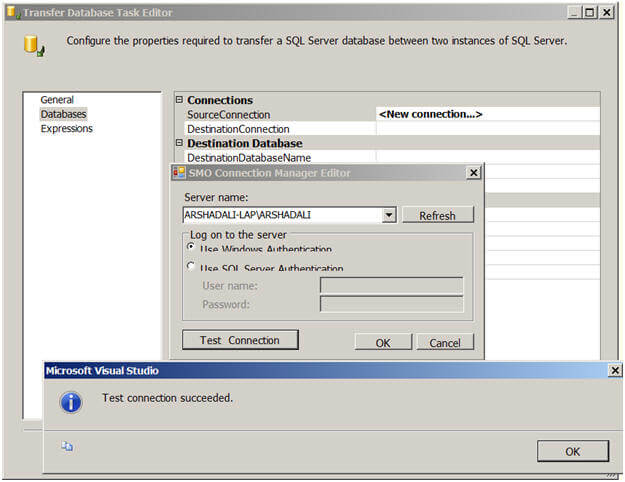
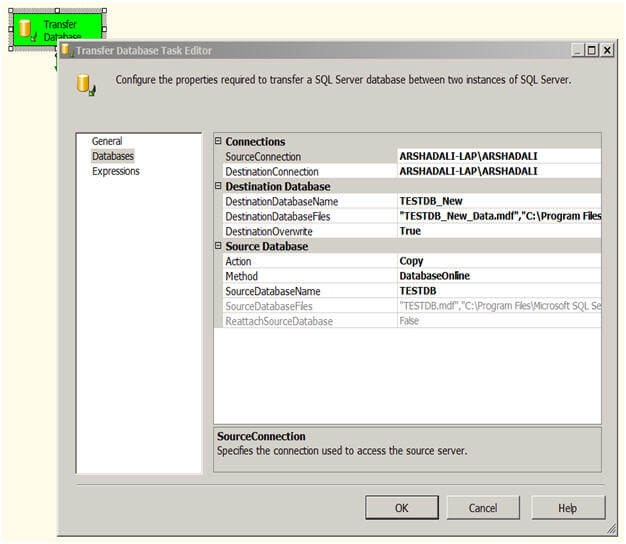
In the "Transfer Database Task Editor", select Databases on the left and 
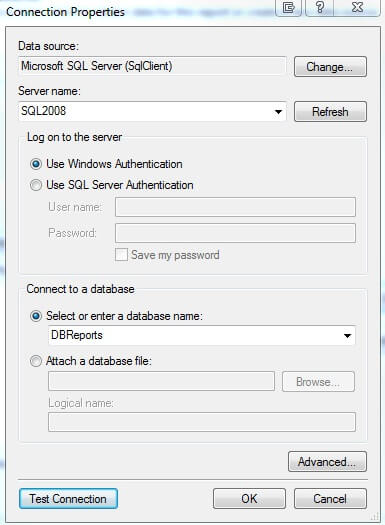
now you are ready to configure this task. SourceConnection is the property to specify the connection for the source SQL Server instance, if you have already created a connection manager then you can reuse it here or can create a new one as shown below. This will also need to be done to configure the DestinationConnection property as well.
In the "Transfer Database Task Editor", select Databases on the left
Next you need to specify the values.
  • Connections
    • SourceConnection - the source instance
    • DestinationConnection - the destination instance
  • Destination Database
    • DestinationDatabaseName - name of the new database
    • DestinationDatabaseFiles - name and location of the database files
    • DestinationOverwrite - if the database already exists on the destination server it will give you an error, so if you want to overwrite the destination database you can set this property to True.
  • Source Database
    • Action - whether you want to copy or move a database.
    • Method - whether you want the copy and move operation to be offline (in this case you also need to provide the network share name which will be used to transmit the database files.
    • SourceDatabaseName - name of the source database
    • SourceDatabaseFiles - name and location of the database files
    • ReattachSourceDatabase - is another property which you can set to TRUE to reattach the source database after the copy operation.
Once you are done with all these configurations you can hit F5 or click on the play icon to execute the package. Your task will turn yellow during the execution and then either red or green depending on the execution outcome. You can go to progress tab to see error messages if the execution fails. Although failure is rare, it is possible if your source database is smaller than the size of the model database on the destination server.
 hit F5 or click on the play icon to execute the package
You can also use Copy Database Wizard to copy and move your database, for details refer to Upgrading to SQL Server 2008 using Copy Database Wizard.

Transfer SQL Server Objects Task

The Transfer SQL Sever Objects task is used to transfer one or more SQL Server objects to a different database, either on the same or another SQL Server instance. This allows you to select different types of objects you want to transfer. You can select tables, views, stored procedures, user defined functions etc. Not only this, you can select a combination of these types of objects to transfer and even select particular objects of a particular object type.
Create another package in the same project and drag a "Transfer SQL Server Objects Task" to the Control Flow. Right click on the task and then select Edit. In the "Transfer SQL Server Objects Task Editor" click on Objects to set the different properties for this task as shown below.
Transfer SQL Server Objects Task
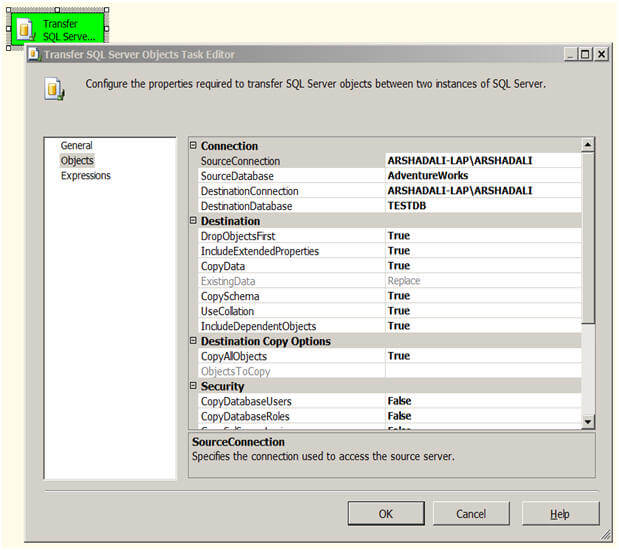
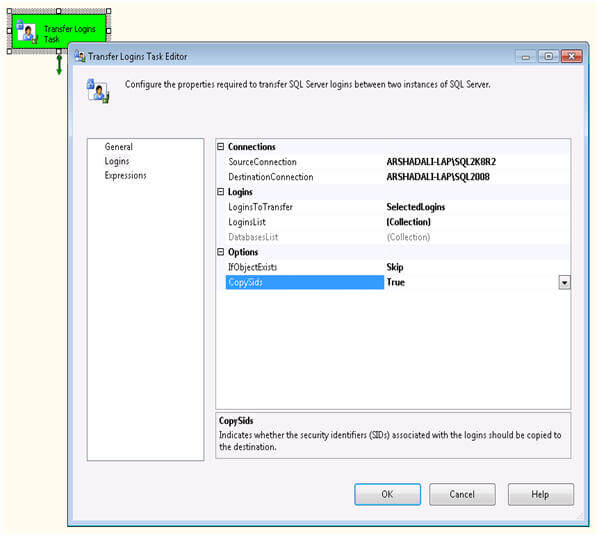
Similar to the way you configured the SourceConnection and DestinationConnection for the Transfer Database Task, you need to configure these properties for this task as well. SourceDatabase is the name of the database from where you are copying the objects and DestinationDatabase is the name of the database to which you are copying the objects to.
  • Connection
    • SourceConnection - the source instance
    • SourceDatabase - name of the source database
    • DestinationConnection - the destination instance
    • DestinationDatabase - name of the new database
  • Destination
    • DropObjectsFirst - Drop selected objects on the target before copy
    • IncludeExtendedProperties - While copying operation also include extended properties of SQL objects being copied
    • CopyData - While copying tables, transfer the data of the selected tables as well
    • ExistingData - whether to append or replace data
    • CopySchema - Copy the schema of the objects being copied
    • UseCollation - Make sure collation of the columns are appropriately set on copied tables
    • IncludeDependentObjects - Include all the objects in copy operation which are dependent on selected objects
  • Destination Copy Objects
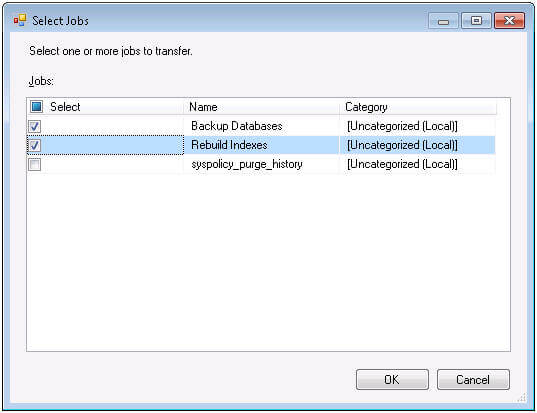
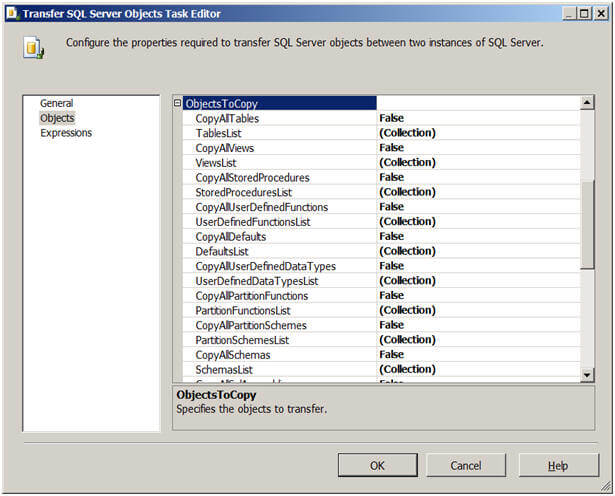
    • CopyAllObjects - Do you want to copy all objects from the source database, if set to False, next property ObjectsToCopy will get enabled.
    • ObjectsToCopy - With this property you select types of objects you want to copy. You can select all objects of one or more types or select particular objects as you can see in the below image. Depending on the SQL Server version, type of objects selection will vary.
  • Security
    • CopyDatabaseUsers - whether to include users
    • CopyDatabaseRoles - whether to include roles
    • CopySQLServerLogins - whether to include logins
    • CopyObjectLevelPermissions - whether to include object level permissions
  • Table Options
    • CopyIndexes - whether to include indexes
    • CopyTriggers - whether to include triggers
    • CopyFullTextIndexes - whether to include full text indexes
    • CopyAllDRIObjects - whether to include referential integrity objects
    • CopyPrimaryKeys - whether to include primary keys
    • CopyForeignKeys - whether to include foreign keys
    • GenerateScriptsInUnicode - whether to create script in Unicode or not
Below is a partial listing of the objects that can be selected.
Depending on the SQL Server version, type of objects selection will vary
The person executing the package with this task must have at least browse objects permissions on the source database and on the destination database must have permissions to drop and create objects.

Transfer Jobs Task in SSIS

Transfer Jobs Task

Transfer Jobs Task is used to transfer SQL Server Agent jobs from one SQL Server instance to another. This task gives you an option to copy all the jobs or selected jobs from the source server to the destination server.
Let's demonstrate how you can create a SSIS package using the Transfer Jobs Task. Goto START -> Microsoft SQL Server 2005/2008 -> SQL Server Business Intelligence Development Studio -> then goto File menu -> New -> Project -> Select "Business Intelligence Projects" in the left tree pane -> Select "Integration Services Projects" and name the project as you wish and click OK.
In this new project you will see there is one package already named "Package.dtsx". Drag a Transfer Jobs Task from the Toolbox (which is normally on the left side) to the Control Flow pane as shown below. Right click on this task and click onEdit...
demonstrate you how you can transfer jobs and logins using the Transfer Jobs Task and Transfer Logins Task respectively without writing any code
In the Transfer Jobs Task Editor, select Jobs on the left and now you are ready to configure this task.
 transfer SQL Server Agent jobs from one SQL Server instance to another
These are the items that can be configured:
  • Connections
    • SourceConnection - specify the connection for the source SQL Server instance, if you have already created a connection then you can reuse it here or can create a new one.
    • DestinationConnection - specify the connection for the destination SQL Server instance.
  • Jobs
    • TransferAllJobs - if this is set to True it will transfer all jobs. If this is set to False you can select specific jobs you want to transfer.
    • JobsList - this will be enabled if TransferAllJobs is set to False. Then you can select specific jobs to transfer. See the image below where I am only selecting two jobs (Backup Databases and Rebuild Indexes) to transfer to the destination.
  • Options
    • IfObjectExists - If the jobs already exist on the destination then you have three choices, first FailTaskexecution, second Overwrite the destination job and third Skip the existing job and continue with others.
    • EnableJobsAtDestination - After the transfer you can also specify whether to enable or disable the jobs.
the person executing the package to transfer jobs must be sysadmin or member of any fixed SQL Server Agent fixed database role on both the source and destination instances
Once you are done with all these configurations you can hit F5 or click on play icon to execute the package. Your task will turn yellow during execution and then either red or green depending on the execution outcome. You can go to the progress/execution results tab to see any error messages if the execution fails.
Note: the person executing the package to transfer jobs must be sysadmin or member of any fixed SQL Server Agent fixed database role on both the source and destination instances.

Transfer Logins Task
Transfer Logins Task is used to transfer either all logins (except sa) or selected logins or all logins of selected databases from the source to the destination SQL Server instance. After the transfer, all the transferred SQL logins are assigned random passwords and SQL logins are disabled. The DBA needs to change the password and enable the SQL login before it can be used on the destination.
Let's walk through an example. Create another package in the current project and drag a Transfer Logins Task from the Toolbox to the Control Flow. Right click on the task and select Edit to configure the task's properties as shown below.
Create another package in the current project and drag a Transfer Logins Task from the Toolbox to the Control Flow
These are the items that can be configured:
  • Connections
    • SourceConnection - specify the connection for the source SQL Server instance
    • DestinationConnection - specify the connection for the destination SQL Server instance
  • Logins
    • LoginsToTransfer - You have three options for this:
      • AllLogins - this will transfer all logins from the source.
      • SelectedLogins - this allows you to select specific logins
      • AllLoginsFromSelectedDatabases - This allows you to transfer all logins associated with one or more databases as shown in the image below.
    • LoginsList - this will allow you to select specific logins if you select SelectedLogins for LoginsToTransfer
    • DatabaseList - this will allow you to select the databases if you select AllLoginsFromSelectedDatabasesfor LoginsToTransfer
  • Options
    • IfObjectExists - If the logins already exist on the destination you have three choices; first FailTaskexecution, second Overwrite the destination logins and third Skip the existing login and continue with the others.
    • CopySids - if you set it to True then security identifiers (SIDs) associated with logins are also copied to the destination
SQL Server Integration Services
Note: the person executing the package to transfer logins must be sysadmin on both the source and destination instances.

HOW TO CONFIGURE DATABASE MAIL ON SQL SERVER 2008

In order to send mail using Database Mail in SQL Server, there are 3 basic steps that need to be carried out:
  1. Create Profile and Account
  2. Configure Email
  3. Send Email

Step 1: Create Profile and Account

You need to create a profile and account using the Configure Database Mail Wizard which can be accessed from the Configure Database Mailcontext menu of the Database Mail node in Management Node.
This wizard is used to manage accounts, profiles, and Database Mail global settings which are shown below:

Step 2: Configure Email


sp_CONFIGURE 'show advanced', 1 GO RECONFIGURE GO sp_CONFIGURE _
 'Database Mail XPs', 1 GO RECONFIGURE GO 

Step 3: Send Email

After all configurations are done, we are now ready to send an email. To send mail, we need to execute a stored procedure sp_send_dbmail and provide the required parameters as shown below:
USE msdb GO EXEC sp_send_dbmail @profile_name='PinalProfile', _
@recipients='test@Example.com', @subject='Test message', _
@body='This is the body of the test message. _
Congrats Database Mail Received By you Successfully.' 
After all validations of the parameters entered are done, certain stored procedures are executed and the mail is queued by Service Broker. Read more at SQL SERVER - Introduction to Service Broker.
Database Mail keeps copies of outgoing e-mail messages and displays them in the sysmail_allitemssysmail_sentitems,sysmail_unsentitemssysmail_faileditems. The status of the mail sent can be seen in sysmail_mailitems table. When the mail is sent successfully, the sent_status field of the sysmail_mailitems table is set to 1 which can again be seen in sysmail_sentitems table. Themails that have failed will have the sent_status field value to 2 and those are unsent will have value 3. The log can be checked in sysmail_logtable as shown below:
SELECT * FROM sysmail_mailitems GO SELECT * FROM sysmail_log GO 
Status can be verified using sysmail_sentitems table.

Saturday, 27 April 2013

Using Map in SSRS Reports-Part1

Understanding Map Reports

There are two concepts that we need to first understand, Map report item and Map layer. Map report item is a new report item in SSRS R2 for map reports whereas Map layer  basically displays the geographical background or map element based on spatial information, either from the Map Gallery (inbuilt map reports with map elements), from a SQL Server query returning spatial information or ESRI (Environmental Systems Research Institute, Inc.) shapefiles. A map report can be layered where each layer will display a layer of geographical background.
The types of map layers that can be added to a map report are as follows:
  • Polygon – represents geographic areas such as countries, states, or cities, etc.
  • Line – represents paths and routes
  • Point – represent locations such as stores, cities, or place
  • Tile – represents Microsoft Bing maps tiles in map report background
When you add a map report item to the report, the first map layer element is added by default, based on spatial data (although the wizard lets you choose the type of map layer to be part of map) and later on, if needed, additional map layers can be added using the New Map Layer Wizard or Add Map Layer option.
The wizard lets you choose the type of map layer

Creating Map Reports

If you want to analyze your data against a geographical background, the first thing that you need to do is to get the geographical data or spatial information. There are three sources:
  • Map Gallery – There are some in built reports with map elements, which you can use as source for spatial information but this is limited to USA states only as of now.
  • ESRI shapefiles – Environmental Systems Research Institute, Inc. provides shapefiles, which can be used as source for geographical data or spatial information. These shapefiles are freely available here. In this article, I will be using the shapefiles only for demonstration. I have downloaded the ESRI shapefiles for countries spatial information that I will be using in the demonstration ahead.
  • SQL Server Spatial Data – If you have geographical data or spatial information already stored in SQL Server, you can use it directly. In the next article, I will demonstrate how you can export ESRI shapefiles to SQL Server and then use it from SQL Server.
To add a map to your report, drag the Map report item from the Toolbox to the designer area:
Drag the map report item from the Toolbox to the designer area
When you drag a Map report item from the Toolbox to the designer area, a wizard will be launched to specify the map layer detail for the map. On the first page of the New Map Layer wizard, you need to specify the source for the spatial/geographical data that contains set of coordinates that define the map areas. As discussed above, there are three options here, the first Map Gallery is very limited so I will choose the ESRI Shapefile option for this demonstration, and in the next article on map report with drilldown I will explore the third option of getting spatial data from SQL Server query:
Choose a source of spatial data
On the next screen of the wizard, we need to specify the map viewing options, such as map resolution (for example high resolution brings the high quality but is heavy weight in terms of performance), adding a Microsoft Bing Map Layer to the map, etc., as shown below:
Choose spatial data and map view options
On the next page of the wizard, you can specify the map visualization option from the available options (it varies from the type of map layer you chose though and you will have a different screen if you choose a map layer other than Polygon):
Choose map visualization
On the next page of the wizard, you can specify the color theme and data visualization option as shown below. There are already some inbuilt themes, which you can choose or customize your map later as and when needed:
Choose color theme and data visualization
Now if you have already data source and data set added to your report, the wizard will ask you to specify the source for the analytical data. In my case I hadn't already, created a data source and data set, so I created it now. Then, to specify the analytical data source for the map layer I need to select the map; from the Map Layer window I need to select the map layer for which I need to specify the layer/analytical data and click on the tiny icon on the right most side as shown below. Then I need to click on Layer Data from the menu bar:
Click on Layer Data from the menu bar
The Layer Data (Map Layer Properties) dialog box appears with different pages. The General page will display the spatial data source information with columns and let you change it if you want to:
Change layer and spatial data source options
Click on the Analytical Data page as shown below and specify the source for the data that you want to visualize in the map. Select the data set and add the mapping/relationship of the columns from the spatial data set with the analytical data as shown below:
Select fields to match spatial and analytical data
I want to analyze data from AdventureWorks2008R2 and used the following query:
SELECT   SP.CountryRegionCode AS   CountryRegionCode, SUM(SOH.SubTotal) Amount
FROM   Sales.SalesOrderHeader SOH
INNER   JOIN Person.Address A ON SOH.BillToAddressID =   A.AddressID
INNER   JOIN Person.StateProvince   SP ON A.StateProvinceID   = SP.StateProvinceID
INNER   JOIN Sales.SalesTerritory   ST ON SP.CountryRegionCode   = ST.CountryRegionCode
GROUP BY SP.CountryRegionCode
Query results
Query results
That’s all, now you can preview the report; you can also change some properties like label and tooltip, as shown below, to make it look more intuitive:
World wide sales map report
During the preview, I was getting a message that the "number of map point elements exceeds the maximum limit for the map.  The remaining points do not appear in the map" and map was not being rendered properly. I increased the values for MaximumTotalPointCount and the MaximumSpatialElementCount property slightly and it worked; refer to this link or this link for more details on the resolution.  
You can customize the appearance of the map by changing the Map Layer properties. Go again to the Map Layer property dialog box and check the "Use bubble size to visualize data" to analyze the data by varying bubble size centered on areas:
Check the "Use bubble size to visualize data" option
After changing the above property, you will see different bubbles of varying size representing the analytical data value area wise; a bigger bubble represents a bigger value and a smaller bubble represents a smaller value as shown below:
World wide sales map report
You can even change the color combination of the area by using the predefined combination or manually. To use standard color combination, again go to the Map Layer properties, check "Use polygon colors to visualize data" and then select the already available color combination from the combo-box as shown below:
Change color theme
Change color theme
This is how it will look like after changing the color combination to "Dark-Light" as shown below:
World wide sales map report in Dark-Light
Source:

Using Map in SSRS Reports-Part2

With SSRS 2008R2 you have the capability of adding maps to your reports using spatial data. In this tip I’ll show you how to accomplish this.
If you have a table with addresses, zip codes, etc. we’ll need to find the latitude and longitude of each address. You can accomplish this by using a geocoding website. There are many out there but I usehttp://www.gpsvisualizer.com/geocoder/ because it's fast and easy to copy and paste multiple addresses into their input box, click "start geocoding" and within seconds it will output latitude and longitude information.
Once you get the latitude and longitude information you can import it into your database. See below for an example of my table of Alabama cities and zip codes with their appropriate coordinates.
list of addresses with latitude and longitude data
Once you have your coordinates we will need to create a new column with a geography data type that we will add our spatial data into. The following code will accomplish this.
ALTER TABLE ZipCodes ADD SpatialData geography
We should now have a table that looks like below:
addresses with spatial data column
Inserting the data into the SpatialData column can be time consuming if you have a lot of records. The best way I have figured out how to do this is to use a basic UPDATE statement. Below is my script I have created for my table for this example. 
UPDATE ZipCodes SET SpatialData = 'POINT(85.972173  31.809675)' WHERE ZipCode = 36081 
UPDATE ZipCodes SET SpatialData = 'POINT(88.053241  30.686394)' WHERE ZipCode = 36685
UPDATE ZipCodes SET SpatialData = 'POINT(86.602739  33.621385)' WHERE ZipCode = 35173
UPDATE ZipCodes SET SpatialData = 'POINT(86.265837  32.35351)' WHERE ZipCode = 36106 
UPDATE ZipCodes SET SpatialData = 'POINT(87.022234  32.41179)' WHERE ZipCode = 36701 
UPDATE ZipCodes SET SpatialData = 'POINT(86.102689  33.43451)' WHERE ZipCode = 35161 
UPDATE ZipCodes SET SpatialData = 'POINT(87.571005  33.209003)' WHERE ZipCode = 35402 
UPDATE ZipCodes SET SpatialData = 'POINT(86.584979  34.729135)' WHERE ZipCode = 35801 
UPDATE ZipCodes SET SpatialData = 'POINT(86.007172  34.014772)' WHERE ZipCode = 35901 
UPDATE ZipCodes SET SpatialData = 'POINT(86.809484  33.517467)' WHERE ZipCode = 35266 
UPDATE ZipCodes SET SpatialData = 'POINT(86.300629  32.38012)' WHERE ZipCode = 36124 
UPDATE ZipCodes SET SpatialData = 'POINT(86.977029  34.60946)' WHERE ZipCode = 35602 
UPDATE ZipCodes SET SpatialData = 'POINT(85.239689  31.941565)' WHERE ZipCode = 36072 
Once you update your table with the spatial data and run SELECT * FROM ZipCodes you should see the following output:
sql server table with spatial data for addresses
If you want to convert the SpatialData from binary back into the text you can use the CONVERT function:
SELECT City, State, ZipCode, CONVERT(varchar(255), SpatialData) AS Coordinates 
FROM ZipCodes  

sql spatial data coordinates
Now that we have all of our data in our table it's time to create our map.
Open Business Intelligence Development Studio and create a new project by going to File, New Project. Under Visual Studio installed templates choose Report Server Project Wizard and choose a Name and Location for your project.
bids project to build map with data points
After clicking OK, the Report Wizard will appear. Click Next at the main screen and then you’ll need to configure the data source. Since my table was created on SQL2008, I will use this server and the database DBReports as my data source. To configure, choose Edit… and fill in the connection properties and click Test Connection. Once the connection is successful click OK. Rename the data source and click Next.
bids connetion manager properties

bids connection manager for sql 2008 r2
On the design query screen use the following query and click Next:
SELECT * FROM ZipCodes  
Select the Tabular Report Type and click Next, Next, Next.
On the Deployment Location screen I'll leave the defaults and click Next.
choosing a deployment location for a ssrs project
Once we are at the Summary Screen, name the report and click Finish. This should bring up the design screen. Once in the design screen go to View, Toolbox to display the Toolbox.
In the toolbox, click the Map icon and click anywhere on the report design screen and the New Map Layer box should appear.
choose a source for spatial data for new map layer
In the Map Layer Box there are a few options including Map gallery, ESRI shapefile, or SQL Server spatial query. The first layer we’ll create will be the basic map layer. I’ll choose Map gallery and drilldown states by county and select Alabama.
ssrs choosing a map layer from map gallery
Click Next where it will display the state of Alabama and it's outlined counties. Here you can add a Bing Map layer if needed and select a Map resolution. Click Next.
choose spatial field and layer type and configure map in ssrs
The next screen will display map visualizations. Here you can select Basic Map, Color Analytical Map, or Bubble Map. For this example, I’ll choose Basic Map.
Next screen will let you choose a theme, single color map, and give you the option to display labels such as county names. Once you are finished customizing your map click Finish.
Next I usually click on the map and scale it to the size I want for display and change the Map Title at the top to an appropriate title.
ssrs map display showing address data
Once you have the map the way you want it you will need to add another layer for the zip codes. To do this right click on the map and select Add Layer. Our New Map Layer box should appear again. This time we’ll choose SQL Server spatial query and click Next.
adding a map layer to show map pinpoints
Choose the existing dataset and click Next
choose a data source in bids
Here you will you see your pinpoints that were specified in the database table. You can also change the layer type if needed. Click Next to choose a map visualization.
chose spatial data and map options for an ssrs report
Once on the map visualization screen you can choose a Basic MarkerMap, Bubble Map, or Analytical Map. For this example I’ll choose Basic Marker Map because I just want to mark my zip codes.
select tyupe of map visualization for ssrs report
The next screen will allow you to choose a Theme, Marker, specify a single/multicolor map and display labels based on your dataset. I’ll choose Generic Theme, PushPin marker, and display labels based on City. Click Finish.
choosing a color theme and data visualization
Once back, you will be in design view, click Preview to preview the report.
display final ssrs report with map and showing pinpoiints on the map
Once you’re map is the way you like it, right click the .rdl in Solution Explorer and Deploy.